Declarative Scenarios for Services Provisioning
For certain tasks, it is convenient to use two key concepts stored in the database:
- Predefined scenarios (action templates)
- A set of variables for each device
In our system:
- ServiceDefinitions — represent the set of variables for devices (stored in the database)
- ServiceScenario — defines the scenario, describing what needs to be done (also stored in the database)
When a service needs to be applied to devices, Services are created and executed via a campaign. The system retrieves the scenario from the database, substitutes variables from ServiceDefinitions, and performs the tasks on the device (CPE).
Thus:
- ServiceDefinitions - define device parameters
- ServiceScenario - define the action logic
- Services + Campaign - create and execute specific tasks for CPE
Creating ServiceScenario Service
A ServiceScenario meta Service will contain all necessary mappings between high-level parameters and corresponding actions on the device. This abstraction layer allows service providers to define services once and apply them across different device types and data models.
Note: NB methods will simplify the transfer of all scenarios between Staging and Production environments, ensuring consistency across deployments.
ServiceScenario Structure
Each ServiceScenario consists of:
-
target_servicetype- Service being provisioned (e.g.,PortMapping,WiFi,Firewall) -
target_action- An action to perform (e.g.,activate,deactivate,modify) -
target_classname- The name of the CPE Class for which this scenario is intended, this applies to CPEs belonging to the specified class, a value of"*"indicates that the scenario applies to all CPEs, regardless of their class -
scenario- An array of Search Path expressions and Service parameter mappings
The scenario is structured as an array of mapping objects, where each object represents a group of parameters that will be set in a single operation:
[
  // Declarative parameters for Step 1
  {"<Search Path expression>": "<Value>"},

  // Declarative parameters for Step 2
  {"<Search Path expression>": "<Value>"},

  ...
]
Value could be:
-
Literal: string, integer, boolean Example:
"Ignore",55,true -
Service parameters key: value will be mapped to Service actual Example:
"{internal_port}" -> "9999" -
Dict with the Service parameters key (value) and the type to which the value should be cast (type): Example:
{"value": "{external_port}", "type": "int"} -> 9999
This approach offers several advantages:
-
Logical grouping of related parameters
-
Better readability of the provisioning logic
-
Simplified troubleshooting when issues occur
-
The ability to handle device-specific parameters gracefully: you can provide groups both for TR-098 and TR-181, the one that is not supported will be ignored
CPE Class Priority Management
If a CPE is associated with multiple CPE Classes, and multiple ScenarioService instances exist for a given action and service type for those CPE Classes, the system will select the ScenarioService from the CPE Class with the highest priority.
ServiceScenario Service Definition:
{
  "servicetype": "ServiceScenario",
  "createNBI": true,
  "allowForPortal": false,
  "attachedToDefaultService": false,
  "refCPE": null,
  "enableActions": true,
  "actions": [
    "add",
    "delete",
    "update"
  ],
  "enableHistory": false,
  "primaryKey": [
    "target_servicetype",
    "target_action",
    "target_classname"
  ],
  "isMeta": true,
  "parameters": [
    {
      "name": "target_servicetype",
      "typeValue": "str",
      "comment": "Target Service Type",
      "restrictions": {},
      "hidden": false,
      "defaultValue": null,
      "changeable": true,
      "optional": false,
      "searchable": true
    },
    {
      "name": "target_action",
      "typeValue": "str",
      "comment": "Target Service Action",
      "restrictions": {
        "enumeration": [
          "activate",
          "reactivate",
          "deactivate",
          "restore",
          "status"
        ]
      },
      "hidden": false,
      "defaultValue": null,
      "changeable": true,
      "optional": false,
      "searchable": false
    },
    {
      "name": "target_classname",
      "typeValue": "str",
      "comment": "Target CPE Class. \"*\" matches all CPE Classes",
      "restrictions": {},
      "hidden": false,
      "defaultValue": "*",
      "changeable": true,
      "optional": false,
      "searchable": true
    },
    {
      "name": "comment",
      "typeValue": "str",
      "comment": "Comment",
      "restrictions": {},
      "hidden": false,
      "defaultValue": null,
      "changeable": true,
      "optional": true,
      "searchable": true
    },
    {
      "name": "scenario",
      "typeValue": "JSON",
      "comment": "Service Scenario",
      "restrictions": {
        "schema": {
          "$schema": "http://json-schema.org/draft-07/schema#",
          "anyOf": [
            {
              "$ref": "#/definitions/stepDef"
            },
            {
              "type": "array",
              "items": {
                "$ref": "#/definitions/stepDef"
              }
            }
          ],
          "definitions": {
            "stepDef": {
              "type": "object",
              "propertyNames": {
                "type": "string"
              },
              "additionalProperties": {
                "anyOf": [
                  {
                    "type": "string"
                  },
                  {
                    "type": "integer"
                  },
                  {
                    "type": "boolean"
                  },
                  {
                    "type": "object",
                    "required": [
                      "value",
                      "type"
                    ],
                    "properties": {
                      "value": {
                        "anyOf": [
                          {
                            "type": "string"
                          },
                          {
                            "type": "integer"
                          },
                          {
                            "type": "boolean"
                          }
                        ]
                      },
                      "type": {
                        "type": "string",
                        "enum": [
                          "int",
                          "str",
                          "boolean"
                        ]
                      }
                    },
                    "additionalProperties": false
                  }
                ]
              }
            }
          }
        }
      },
      "hidden": false,
      "defaultValue": "{}",
      "changeable": true,
      "optional": false,
      "searchable": false
    }
  ]
}
Service Examples
PortMapping Service
PortMapping is a common service that requires finding the proper rule or creating a new one and setting required parameters to forward external traffic to internal devices.
Creating Service Definition
{
  "servicetype": "PortMapping",
  "createNBI": true,
  "allowForPortal": false,
  "attachedToDefaultService": false,
  "refCPE": null,
  "enableActions": true,
  "actions": [
    "activate",
    "deactivate",
    "status",
    "restore"
  ],
  "enableHistory": false,
  "primaryKey": [
    "cpeid",
    "external_port"
  ],
  "isMeta": false,
  "parameters": [
    {
      "name": "external_port_range_end",
      "typeValue": "int",
      "comment": "End Port Range",
      "restrictions": {},
      "hidden": false,
      "defaultValue": null,
      "changeable": false,
      "optional": false,
      "searchable": true
    },
    {
      "name": "protocol",
      "typeValue": "str",
      "comment": "protocol",
      "restrictions": {
        "enumeration": [
          "TCP",
          "UDP"
        ]
      },
      "hidden": false,
      "defaultValue": null,
      "changeable": false,
      "optional": false,
      "searchable": true
    },
    {
      "name": "internal_ip",
      "typeValue": "str",
      "comment": "internal_ip",
      "restrictions": {},
      "hidden": false,
      "defaultValue": null,
      "changeable": false,
      "optional": false,
      "searchable": true
    },
    {
      "name": "internal_port",
      "typeValue": "int",
      "comment": "Internal Port",
      "restrictions": {},
      "hidden": false,
      "defaultValue": null,
      "changeable": false,
      "optional": false,
      "searchable": true
    },
    {
      "name": "external_port",
      "typeValue": "int",
      "comment": "External Port",
      "restrictions": {},
      "hidden": false,
      "defaultValue": null,
      "changeable": false,
      "optional": false,
      "searchable": true
    },
    {
      "name": "name",
      "typeValue": "text",
      "comment": "Description",
      "restrictions": {},
      "hidden": false,
      "defaultValue": null,
      "changeable": false,
      "optional": false,
      "searchable": true
    }
  ]
}
This Service Definition allows us to create new portmapping services using a standardized format with a primary key:
{
  "ServiceIdentifiers": {
    "cpeid": "tp181-portmapping",
    "external_port": 9999
  },
  "ServiceParameters": {
    "external_port_range_end": 9999,
    "protocol": "UDP",
    "internal_ip": "192.168.1.1",
    "internal_port": 9999,
    "external_port": 9999,
    "name": "test"
  }
}
Creating a ServiceScenario
ServiceScenarios describe the mapping between ServiceParameters and parameters on the CPE device. We'll use a universal approach that works with both TR-181 and TR-98 data models.
Important Notes:
-
Parameters that cannot be found on a specific CPE will be gracefully ignored
-
This enables support for vendor-specific parameters without breaking the scenario
-
Parameter mappings are grouped and applied in steps via different SetParameterValues operations
-
This approach improves readability and troubleshooting of the provisioning logic
Activate
The activate action creates or configures a portmapping rule on the device. Here's the ServiceScenario for activation:
{
  "target_action": "activate",
  "target_servicetype": "PortMapping",
  "target_classname": "TR098",
  "scenario": [
    {
      "~InternetGatewayDevice.WANDevice.1.WANConnectionDevice.1.WANPPPConnection.1.PortMapping.[ExternalPort=={external_port}].ExternalPort": "{external_port}"
    },
    {
      "InternetGatewayDevice.WANDevice.1.WANConnectionDevice.1.WANPPPConnection.1.PortMapping.[ExternalPort=={external_port}].X_AX69": "Ignore",
      "InternetGatewayDevice.WANDevice.1.WANConnectionDevice.1.WANPPPConnection.1.PortMapping.[ExternalPort=={external_port}].PortMappingEnabled": true,
      "InternetGatewayDevice.WANDevice.1.WANConnectionDevice.1.WANPPPConnection.1.PortMapping.[ExternalPort=={external_port}].PortMappingProtocol": "{protocol}",
      "InternetGatewayDevice.WANDevice.1.WANConnectionDevice.1.WANPPPConnection.1.PortMapping.[ExternalPort=={external_port}].PortMappingDescription": "{name}",
      "InternetGatewayDevice.WANDevice.1.WANConnectionDevice.1.WANPPPConnection.1.PortMapping.[ExternalPort=={external_port}].InternalPort": "{internal_port}",
      "InternetGatewayDevice.WANDevice.1.WANConnectionDevice.1.WANPPPConnection.1.PortMapping.[ExternalPort=={external_port}].InternalClient": "{internal_ip}",
      "InternetGatewayDevice.WANDevice.1.WANConnectionDevice.1.WANPPPConnection.1.PortMapping.[ExternalPort=={external_port}].ExternalPortEndRange": "{external_port_range_end}"
    }
  ]
}
{
  "target_action": "activate",
  "target_servicetype": "PortMapping",
  "target_classname": "TR181",
  "scenario": [
    {
      "~Device.NAT.PortMapping.[ExternalPort=={external_port}].ExternalPort": "{external_port}"
    },
    {
      "Device.NAT.PortMapping.[ExternalPort=={external_port}].Enable": true,
      "Device.NAT.PortMapping.[ExternalPort=={external_port}].Protocol": "{protocol}",
      "Device.NAT.PortMapping.[ExternalPort=={external_port}].Description": "{name}",
      "Device.NAT.PortMapping.[ExternalPort=={external_port}].InternalPort": "{internal_port}",
      "Device.NAT.PortMapping.[ExternalPort=={external_port}].InternalClient": "{internal_ip}",
      "Device.NAT.PortMapping.[ExternalPort=={external_port}].ExternalPortEndRange": "{external_port_range_end}"
    }
  ]
}
Explanation of the Activate Scenario
First Step: Creates a portmapping entry in the TR-98 data model if it doesn't exist
-
The
~prefix ensures the object is created if it doesn't exist -
The search expression
[ExternalPort=={external_port}]finds the rule or creates it -
{external_port}is replaced with the actual value from ServiceParameters
Second Step: Configures all TR-98 portmapping parameters
-
Sets internal port, IP, description, and enables the rule
-
Note that
X_AX69is a vendor-specific parameter and will be ignored if not present
Third Step: Creates a portmapping entry in the TR-181 data model if it doesn't exist
- Similar to step 1, but using the TR-181 data model path
Fourth Step: Configures all TR-181 portmapping parameters
-
Sets the protocol, description, ports, and client IP
-
Includes the external port end range for port range mappings
This structure allows the same service to work across different devices supporting either TR-98 or TR-181 data models. If a device only supports one data model, the steps for the other model will be gracefully ignored.
Deactivate
The deactivate action disables a portmapping rule on the device without removing it, allowing for easy reactivation later:
{
  "target_action": "deactivate",
  "target_servicetype": "PortMapping",
  "target_classname": "TR098",
  "scenario": [
    {
      "InternetGatewayDevice.WANDevice.1.WANConnectionDevice.1.WANPPPConnection.1.PortMapping.[ExternalPort=={external_port}].PortMappingEnabled": false
    }
  ]
}
{
  "target_action": "deactivate",
  "target_servicetype": "PortMapping",
  "target_classname": "TR181",
  "scenario": [
    {
      "Device.NAT.PortMapping.[ExternalPort=={external_port}].Enable": false
    }
  ]
}
Explanation of the Deactivate Scenario
First Step: Disables the portmapping in the TR-181 data model
-
Sets the
Enableparameter tofalse -
Uses the search expression to find the correct rule by
external port
Second Step: Disables the portmapping in the TR-98 data model
-
Sets the
PortMappingEnabledparameter tofalse -
Uses the same search expression approach
The deactivate action is simpler than activate because it only needs to disable existing rules without creating or configuring them.
Status
{
  "target_action": "status",
  "target_servicetype": "PortMapping",
  "target_classname": "TR098",
  "scenario": {
    "InternetGatewayDevice.WANDevice.1.WANConnectionDevice.1.WANPPPConnection.1.PortMapping.[ExternalPort=={external_port}].PortMappingEnabled": true,
    "InternetGatewayDevice.WANDevice.1.WANConnectionDevice.1.WANPPPConnection.1.PortMapping.[ExternalPort=={external_port}].PortMappingProtocol": "{protocol}",
    "InternetGatewayDevice.WANDevice.1.WANConnectionDevice.1.WANPPPConnection.1.PortMapping.[ExternalPort=={external_port}].PortMappingDescription": "{name}",
    "InternetGatewayDevice.WANDevice.1.WANConnectionDevice.1.WANPPPConnection.1.PortMapping.[ExternalPort=={external_port}].ExternalPort": {
      "type": "int",
      "value": "{external_port}"
    },
    "InternetGatewayDevice.WANDevice.1.WANConnectionDevice.1.WANPPPConnection.1.PortMapping.[ExternalPort=={external_port}].InternalPort": {
      "type": "int",
      "value": "{internal_port}"
    },
    "InternetGatewayDevice.WANDevice.1.WANConnectionDevice.1.WANPPPConnection.1.PortMapping.[ExternalPort=={external_port}].InternalClient": "{internal_ip}",
    "InternetGatewayDevice.WANDevice.1.WANConnectionDevice.1.WANPPPConnection.1.PortMapping.[ExternalPort=={external_port}].ExternalPortEndRange": {
      "type": "int",
      "value": "{external_port_range_end}"
    }
  }
}
{
  "target_action": "status",
  "target_servicetype": "PortMapping",
  "target_classname": "TR181",
  "scenario": {
    "Device.NAT.PortMapping.[ExternalPort=={external_port}].Enable": true,
    "Device.NAT.PortMapping.[ExternalPort=={external_port}].Protocol": "{protocol}",
    "Device.NAT.PortMapping.[ExternalPort=={external_port}].Description": "{name}",
    "Device.NAT.PortMapping.[ExternalPort=={external_port}].ExternalPort": {
      "type": "int",
      "value": "{external_port}"
    },
    "Device.NAT.PortMapping.[ExternalPort=={external_port}].InternalPort": {
      "type": "int",
      "value": "{internal_port}"
    },
    "Device.NAT.PortMapping.[ExternalPort=={external_port}].InternalClient": "{internal_ip}",
    "Device.NAT.PortMapping.[ExternalPort=={external_port}].ExternalPortEndRange": {
      "type": "int",
      "value": "{external_port_range_end}"
    }
  }
}
Explanation of the Status Scenario
First (and only) Step: Compares CPE's actual values with target values for existing parameters
-
For TR-098 CPE TR-181 data model parameters will be ignored
-
For TR-181 CPE TR-098 data model parameters will be ignored
HSI Service
HSI is a common service that requires finding the proper WAN PPPoE connection or PPP interface or creating a new one and setting credentials and other required parameters optionally.
Creating Service Definition
{
  "servicetype": "HSI",
  "createNBI": true,
  "allowForPortal": false,
  "attachedToDefaultService": false,
  "refCPE": null,
  "enableActions": true,
  "actions": [
    "activate",
    "deactivate",
    "status",
    "restore"
  ],
  "enableHistory": false,
  "primaryKey": [
    "cpeid"
  ],
  "isMeta": false,
  "parameters": [
    {
      "name": "username",
      "typeValue": "str",
      "comment": "PPPoE Username",
      "restrictions": {},
      "hidden": false,
      "defaultValue": null,
      "changeable": true,
      "optional": false,
      "searchable": true
    },
    {
      "name": "password",
      "typeValue": "str",
      "comment": "PPPoE Password",
      "restrictions": {},
      "hidden": true,
      "defaultValue": null,
      "changeable": true,
      "optional": false,
      "searchable": false
    }
  ]
}
This Service Definition allows us to configure WAN PPPoE connection or PPP interface for specific CPE:
{
  "ServiceIdentifiers": {
    "cpeid": "DMS_DEVICE"
  },
  "ServiceParameters": {
    "username": "inet",
    "password": "supersecure"
  }
}
Creating a ServiceScenario
Activate
The activate action creates and/or configures a WAN PPPoE connection or PPP interface on the device. Here's the ServiceScenario for activation:
{
  "target_action": "activate",
  "target_servicetype": "HSI",
  "target_classname": "TR098",
  "scenario": [
    {
      "~InternetGatewayDevice.WANDevice.1.WANConnectionDevice.1.WANPPPConnection.[Name=='HSI'].Name": "HSI"
    },
    {
      "InternetGatewayDevice.WANDevice.1.WANConnectionDevice.1.WANPPPConnection.[Name=='HSI'].Password": "{ppp_password}",
      "InternetGatewayDevice.WANDevice.1.WANConnectionDevice.1.WANPPPConnection.[Name=='HSI'].Username": "{ppp_username}",
      "InternetGatewayDevice.WANDevice.1.WANConnectionDevice.1.WANPPPConnection.[Name=='HSI'].Enable": true
    }
  ]
}
{
  "target_action": "activate",
  "target_servicetype": "HSI",
  "target_classname": "TR181",
  "scenario": [
    {
      "~Device.PPP.Interface.[Name=='HSI'].Name": "HSI"
    },
    {
      "Device.PPP.Interface.[Name=='HSI'].Password": "{ppp_password}",
      "Device.PPP.Interface.[Name=='HSI'].Username": "{ppp_username}",
      "Device.PPP.Interface.[Name=='HSI'].Enable": true
    }
  ]
}
Explanation of the Activate Scenario
First Step: Creates a WAN PPPoE connection entry in the TR-98 data model if it doesn't exist
-
The
~prefix ensures the object is created if it doesn't exist -
The search expression
[Name=='HSI']finds the connection or creates it
Second Step: Configures all required TR-98 WAN PPPoE connection parameters
- Sets credentials and enables it
Third Step: Creates a PPP interface entry in the TR-181 data model if it doesn't exist
- Similar to step 1, but using the TR-181 data model path
Fourth Step: Configures all required TR-181 PPP interface parameters
- Similar to step 2, but using the TR-181 data model path
This structure allows the same service to work across different devices supporting either TR-98 or TR-181 data models. If a device only supports one data model, the steps for the other model will be gracefully ignored.
Deactivate
The deactivate action disables a WAN PPPoE connection or PPP interface on the device without removing it, allowing for easy reactivation later:
{
  "target_action": "deactivate",
  "target_servicetype": "HSI",
  "target_classname": "TR098",
  "scenario": [
    {
      "InternetGatewayDevice.WANDevice.1.WANConnectionDevice.1.WANPPPConnection.[Name=='HSI'].Enable": false
    }
  ]
}
{
  "target_action": "deactivate",
  "target_servicetype": "HSI",
  "target_classname": "TR181",
  "scenario": [
    {
      "Device.PPP.Interface.[Name=='HSI'].Enable": false
    }
  ]
}
Explanation of the Deactivate Scenario
First Step: Disables the WAN PPPoE connection in the TR-98 data model
-
Sets the
Enableparameter tofalse -
Uses the same search expression approach
Second Step: Disables the PPP interface in the TR-181 data model
-
Sets the
Enableparameter tofalse -
Uses the same search expression approach
Status
{
  "target_action": "status",
  "target_servicetype": "HSI",
  "target_classname": "TR098",
  "scenario": {
    "InternetGatewayDevice.WANDevice.1.WANConnectionDevice.1.WANPPPConnection.[Name=='HSI'].Username": "{ppp_username}",
    "InternetGatewayDevice.WANDevice.1.WANConnectionDevice.1.WANPPPConnection.[Name=='HSI'].Enable": true
  }
}
{
  "target_action": "status",
  "target_servicetype": "HSI",
  "target_classname": "TR181",
  "scenario": {
    "Device.PPP.Interface.[Name=='HSI'].Username": "{ppp_username}",
    "Device.PPP.Interface.[Name=='HSI'].Enable": true
  }
}
Explanation of the Status Scenario
First (and only) Step: Compares CPE's actual values of WAN PPPoE connection or PPP interface with target values for existing parameters
-
For TR-098 CPE TR-181 data model parameters will be ignored
-
For TR-181 CPE TR-098 data model parameters will be ignored
VOIP Service
VOIP is a common service that configures a Voice Line.
Creating Service Definition
{
  "servicetype": "VOIP",
  "createNBI": true,
  "allowForPortal": false,
  "attachedToDefaultService": false,
  "refCPE": null,
  "enableActions": true,
  "actions": [
    "activate",
    "deactivate",
    "status",
    "restore"
  ],
  "enableHistory": false,
  "primaryKey": [
    "cpeid",
    "lineID"
  ],
  "isMeta": false,
  "parameters": [
    {
      "name": "lineID",
      "typeValue": "int",
      "comment": "SIP Line ID",
      "restrictions": {
        "enumeration": [
          1,
          2
        ]
      },
      "hidden": false,
      "defaultValue": null,
      "changeable": true,
      "optional": false,
      "searchable": true
    },
    {
      "name": "username",
      "typeValue": "str",
      "comment": "SIP Username",
      "restrictions": {},
      "hidden": false,
      "defaultValue": null,
      "changeable": true,
      "optional": false,
      "searchable": true
    },
    {
      "name": "password",
      "typeValue": "str",
      "comment": "SIP Password",
      "restrictions": {},
      "hidden": true,
      "defaultValue": null,
      "changeable": true,
      "optional": true,
      "searchable": false
    },
    {
      "name": "registration_server",
      "typeValue": "str",
      "comment": "Registration server",
      "restrictions": {},
      "hidden": false,
      "defaultValue": "test",
      "changeable": true,
      "optional": true,
      "searchable": true
    }
  ]
}
This Service Definition allows us to configure Voice Line for specific CPE:
{
  "ServiceIdentifiers": {
    "cpeid": "DMS_DEVICE",
    "lineID": 1
  },
  "ServiceParameters": {
    "lineID": 1,
    "username": "voice",
    "password": "megasecure",
    "registration_server": "cool.voice.service"
  }
}
Creating a ServiceScenario
Activate
The activate action configures Voice Line and Profile:
{
  "target_action": "activate",
  "target_servicetype": "VOIP",
  "target_classname": "*",
  "scenario": [
    {
      "Device.Services.VoiceService.1.VoiceProfile.1.SIP.RegistrarServer": "{registration_server}",
      "Device.Services.VoiceService.1.VoiceProfile.1.Line.{lineID}.SIP.AuthPassword": "{password}",
      "Device.Services.VoiceService.1.VoiceProfile.1.Line.{lineID}.SIP.AuthUserName": "{username}",
      "Device.Services.VoiceService.1.VoiceProfile.1.Line.{lineID}.Enable": "Enabled",
      "Device.Services.VoiceService.1.VoiceProfile.1.Enable": "Enabled"
    }
  ]
}
Explanation of the Activate Scenario
First (and only) Step: Configures Voice Line and Profile
-
Just configures existing objects
-
{lineID}in the key is also replaced with the actual value from ServiceParameters -
Voice parameters for TR-98 or TR-181 data models are the same, the root object
DeviceorInternetGatewayDevicewill be detected automatically
Deactivate
The deactivate action disables Voice Line:
{
  "target_action": "deactivate",
  "target_servicetype": "VOIP",
  "target_classname": "*",
  "scenario": [
    {
      "Device.Services.VoiceService.1.VoiceProfile.1.SIP.RegistrarServer": "",
      "Device.Services.VoiceService.1.VoiceProfile.1.Line.{lineID}.SIP.AuthPassword": "",
      "Device.Services.VoiceService.1.VoiceProfile.1.Line.{lineID}.SIP.AuthUserName": "",
      "Device.Services.VoiceService.1.VoiceProfile.1.Line.{lineID}.Enable": "Disabled"
    }
  ]
}
Explanation of the Deactivate Scenario
First (and only) Step: Disables the Voice Line
-
Sets the
Enableparameter to"Disabled", credentials to empty strings -
Voice parameters for TR-98 or TR-181 data models are the same, the root object Device or InternetGatewayDevice will be detected automatically
Status
{
  "target_action": "status",
  "target_servicetype": "VOIP",
  "target_classname": "*",
  "scenario": {
    "Device.Services.VoiceService.1.VoiceProfile.1.SIP.RegistrarServer": "{registration_server}",
    "Device.Services.VoiceService.1.VoiceProfile.1.Line.{lineID}.SIP.AuthUserName": "{username}",
    "Device.Services.VoiceService.1.VoiceProfile.1.Line.{lineID}.Enable": "Enabled",
    "Device.Services.VoiceService.1.VoiceProfile.1.Enable": "Enabled"
  }
}
Explanation of the Status Scenario
First (and only) Step: Compares CPE's actual values of Voice Line and Profile with target values for existing parameters
- For TR-098 and TR-181 CPE parameters are the same
Scenarios Running
Swagger (API)
-
Call the
/Declarative.Services.actionmethod (for activate/deactivate) -
Call the
/Declarative.Services.statusmethod (for status)
Support Portal
-
Navigate to the RPC section on the target CPE
-
Select:
ApplyPath— if you want to test the scenario directly described in Declarative RPC.Declarative.Services.action/status— if you want to test it as a service
Scenarios
To test a declarative service provisioning scenario independently of any predefined Service Definition, use the Declarative.Services.action scenario (for activate, deactivate, etc.) or the Declarative.Services.status scenario (for status only). These methods allow you to simulate the execution of a service scenario by manually providing both the declarative scenario body and dummy service parameters.
This approach is especially useful for:
-
Prototyping new service scenarios
-
Debugging template search paths using wildcards
-
Verifying service behavior without modifying or creating actual services
To run a scenario via the Support Portal, go to the RPC tab on the target CPE device and select Declarative.Services.action or Declarative.Services.status.
Request Structure
The input JSON must include two top-level keys:
-
service— a mock Service object with:-
servicetype: the name of the Service (e.g. "PortMapping") -
props: a dictionary of Service parameters (used to resolve placeholders in the scenario)
-
-
scenario— a Declarative Scenario with placeholders ({...}) as target values, which will be replaced using actual values from Service parameters
Example Request for Activate
Method: Declarative.Services.action
Request:
{
  "service": {
    "servicetype": "PortMapping",
    "props": {
      "external_port_range_end": 779,
      "protocol": "TCP",
      "internal_ip": "192.168.0.100",
      "internal_port": 888,
      "external_port": 777,
      "name": "MyRule1"
    }
  },
  "scenario": {
    "InternetGatewayDevice.WANDevice.1.WANConnectionDevice.1.WANPPPConnection.1.PortMapping.[ExternalPort=={external_port}].X_AX69": "Ignore",
    "InternetGatewayDevice.WANDevice.1.WANConnectionDevice.1.WANPPPConnection.1.PortMapping.[ExternalPort=={external_port}].InternalPort": "{internal_port}",
    "InternetGatewayDevice.WANDevice.1.WANConnectionDevice.1.WANPPPConnection.1.PortMapping.[ExternalPort=={external_port}].InternalClient": "{internal_ip}",
    "InternetGatewayDevice.WANDevice.1.WANConnectionDevice.1.WANPPPConnection.1.PortMapping.[ExternalPort=={external_port}].PortMappingEnabled": true,
    "InternetGatewayDevice.WANDevice.1.WANConnectionDevice.1.WANPPPConnection.1.PortMapping.[ExternalPort=={external_port}].PortMappingProtocol": "{protocol}",
    "InternetGatewayDevice.WANDevice.1.WANConnectionDevice.1.WANPPPConnection.1.PortMapping.[ExternalPort=={external_port}].ExternalPortEndRange": "{external_port_range_end}",
    "InternetGatewayDevice.WANDevice.1.WANConnectionDevice.1.WANPPPConnection.1.PortMapping.[ExternalPort=={external_port}].PortMappingDescription": "{name}"
  }
}
Response:
{
  "code": 200,
  "details": [
    {
      "code": 200,
      "message": "Done"
    }
  ],
  "message": "Done"
}
Example Request for Deactivate
Method: Declarative.Services.action
Request:
{
  "service": {
    "servicetype": "PortMapping",
    "props": {
      "external_port_range_end": 779,
      "protocol": "TCP",
      "internal_ip": "192.168.0.100",
      "internal_port": 888,
      "external_port": 777,
      "name": "MyRule1"
    }
  },
  "scenario": {
    "InternetGatewayDevice.WANDevice.1.WANConnectionDevice.1.WANPPPConnection.1.PortMapping.[ExternalPort=={external_port}].PortMappingEnabled": false
  }
}
Response:
{
  "code": 200,
  "details": [
    {
      "code": 200,
      "message": "Done"
    }
  ],
  "message": "Done"
}
Example Request for Status
Method: Declarative.Services.status
Request:
{
  "service": {
    "servicetype": "PortMapping",
    "props": {
      "external_port_range_end": 779,
      "protocol": "TCP",
      "internal_ip": "192.168.0.100",
      "internal_port": 888,
      "external_port": 777,
      "name": "MyRule1"
    }
  },
  "scenario": "scenario": {
    "Device.NAT.PortMapping.[ExternalPort=={external_port}].Enable": true,
    "Device.NAT.PortMapping.[ExternalPort=={external_port}].Protocol": "{protocol}",
    "Device.NAT.PortMapping.[ExternalPort=={external_port}].Description": "{name}",
    "Device.NAT.PortMapping.[ExternalPort=={external_port}].ExternalPort": {
      "type": "int",
      "value": "{external_port}"
    },
    "Device.NAT.PortMapping.[ExternalPort=={external_port}].InternalPort": {
      "type": "int",
      "value": "{internal_port}"
    },
    "Device.NAT.PortMapping.[ExternalPort=={external_port}].InternalClient": "{internal_ip}",
    "Device.NAT.PortMapping.[ExternalPort=={external_port}].ExternalPortEndRange": {
      "type": "int",
      "value": "{external_port_range_end}"
    },
    "InternetGatewayDevice.WANDevice.1.WANConnectionDevice.1.WANPPPConnection.1.PortMapping.[ExternalPort=={external_port}].PortMappingEnabled": true,
    "InternetGatewayDevice.WANDevice.1.WANConnectionDevice.1.WANPPPConnection.1.PortMapping.[ExternalPort=={external_port}].PortMappingProtocol": "{protocol}",
    "InternetGatewayDevice.WANDevice.1.WANConnectionDevice.1.WANPPPConnection.1.PortMapping.[ExternalPort=={external_port}].PortMappingDescription": "{name}",
    "InternetGatewayDevice.WANDevice.1.WANConnectionDevice.1.WANPPPConnection.1.PortMapping.[ExternalPort=={external_port}].ExternalPort": {
      "type": "int",
      "value": "{external_port}"
    },
    "InternetGatewayDevice.WANDevice.1.WANConnectionDevice.1.WANPPPConnection.1.PortMapping.[ExternalPort=={external_port}].InternalPort": {
      "type": "int",
      "value": "{internal_port}"
    },
    "InternetGatewayDevice.WANDevice.1.WANConnectionDevice.1.WANPPPConnection.1.PortMapping.[ExternalPort=={external_port}].InternalClient": "{internal_ip}",
    "InternetGatewayDevice.WANDevice.1.WANConnectionDevice.1.WANPPPConnection.1.PortMapping.[ExternalPort=={external_port}].ExternalPortEndRange": {
      "type": "int",
      "value": "{external_port_range_end}"
    }
  }
}
Response after Activate:
{
  "code": 200,
  "message": "Service is active",
  "status": 1
}
Response after Deactivate:
{
  "code": 200,
  "message": "Service is in-active",
  "status": 0
}
In those examples all {...} placeholders inside the scenarios are automatically resolved using corresponding keys from service.props.
Service Configuration
This section provides step-by-step instructions for creating a service definition, scenario, service instance, campaign, and ultimately using the REST API.
1. Creating a Service Definition
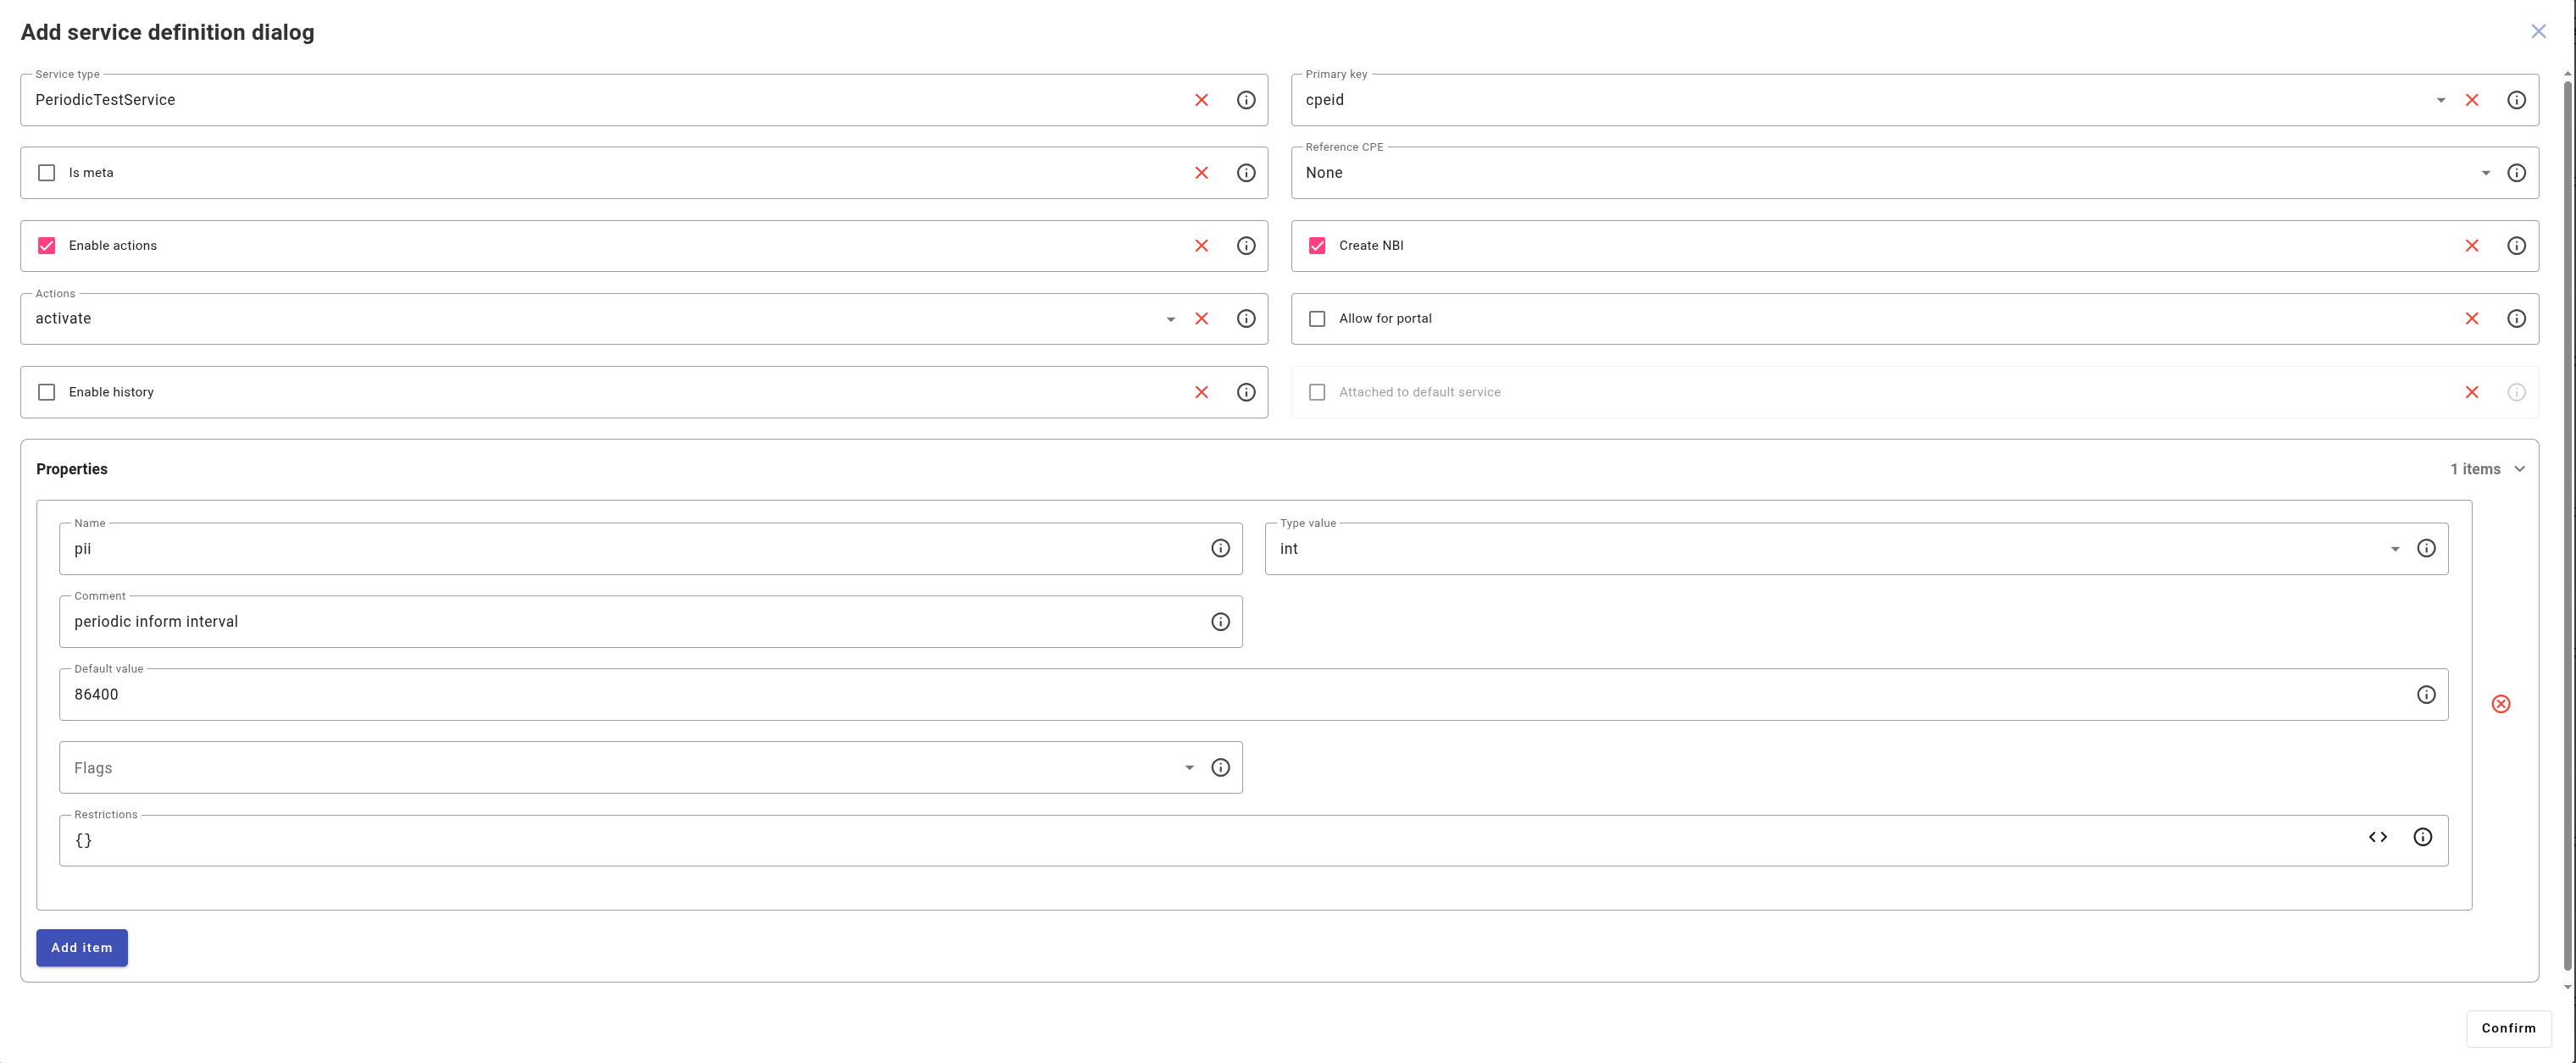
Example: Create a service template PeriodicTestService that will contain its parameters and settings.
- Go to the Services Admin Portal section
- Click the Add button to create a new record.
| Field | Value | Description |
|---|---|---|
| Service type | PeriodicTestService | Service type |
| Primary key | cpeid | Service identifier |
| Reference CPE | None | Reference to CPE object |
| Enable actions | (checked) | Indicates whether service actions are enabled |
| Create NBI | (checked) | Indicates whether NBI methods are created automatically |
- Adding a Property:
- Click Add item
- Name:
pii - Comment:
periodic inform interval - Default value:
86400(default value in seconds) - Flags: leave empty
- Restrictions:
{}
- Click the Confirm button to save.
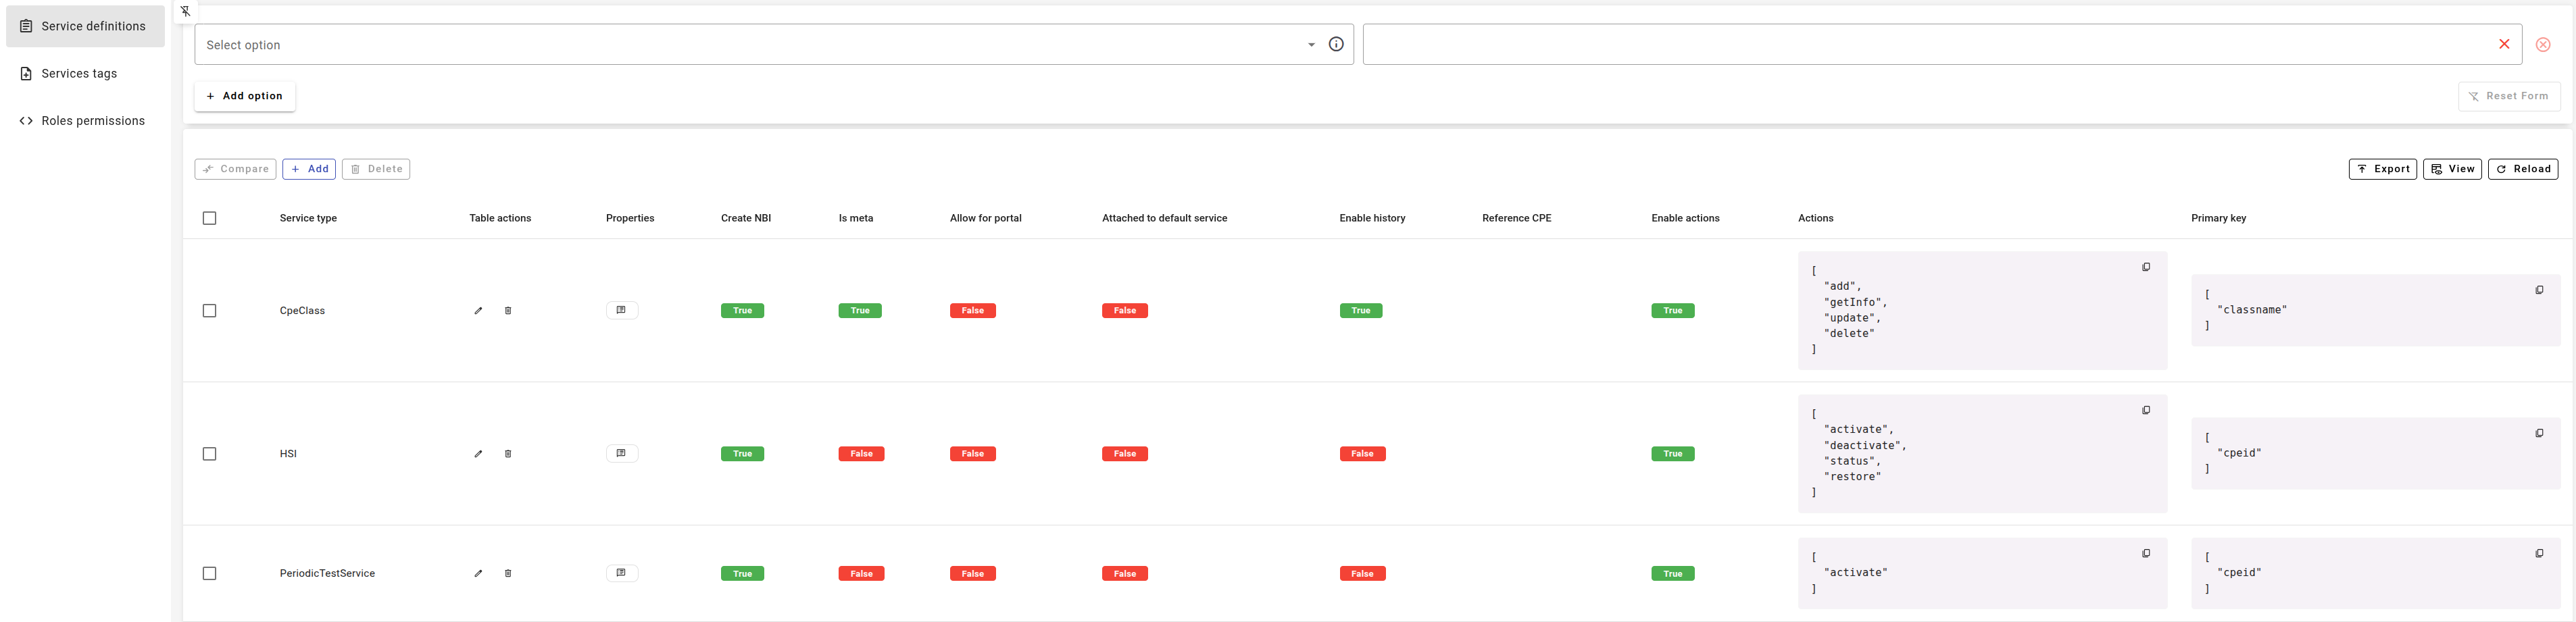
A new PeriodicTestService entry will appear in the service definitions list with the configured primary key and pii property.
2. Creating a Service Scenario
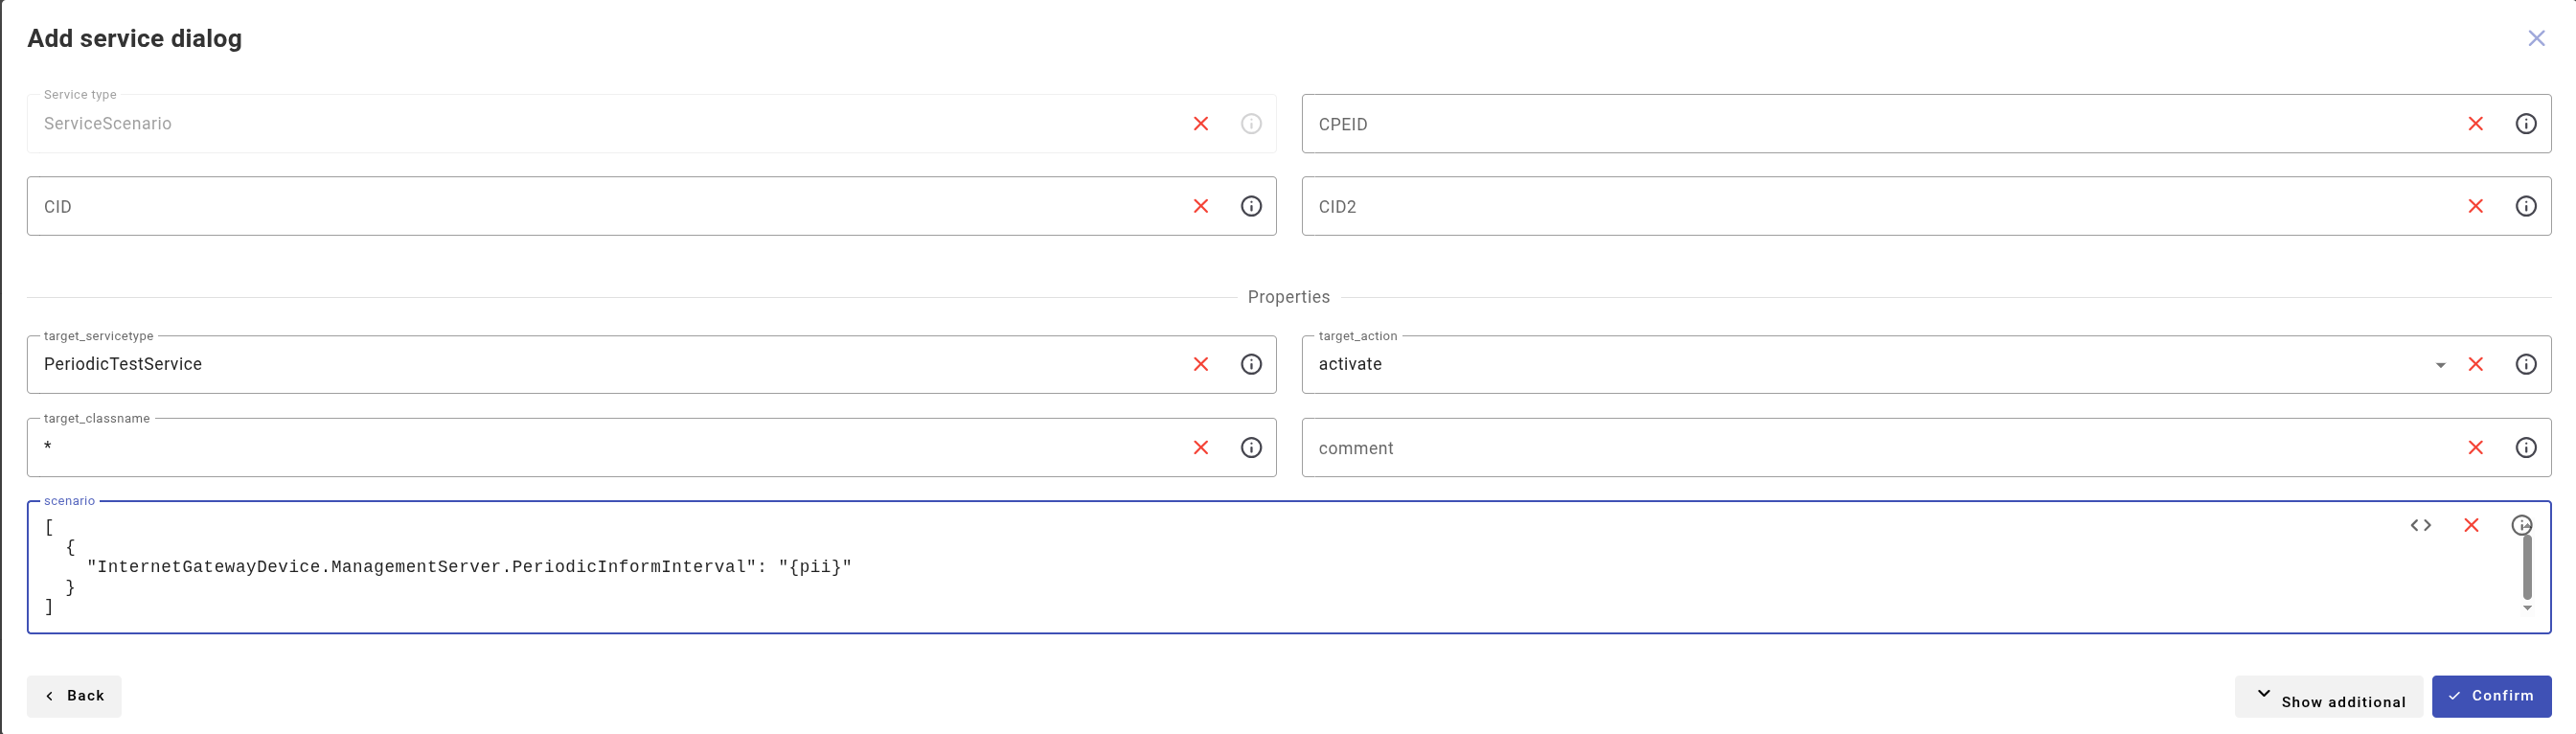
Example: Create a scenario that will link the activate action and the target service PeriodicTestService with a specific set of parameters.
Go to the Services Portal section
-
Click the Add button to create a new service.
-
On the first step, select the definition type ServiceScenario and click Next.

-
Fill in the form
-
Properties block:
| Field | Value | Description |
|---|---|---|
| target_servicetype | PeriodicTestService | Target service |
| target_classname | * | Apply to all device classes |
| target_action | activate | Action to perform |
| scenario | [ { "InternetGatewayDevice.ManagementServer.PeriodicInformInterval": "{pii}" } ] | A JSON array containing a parameter and a variable. Each element of the array represents an SPV (Set Parameter Values) |
| comment | (optional) | Scenario comment |
- Click Confirm to save.
A new entry with type ServiceScenario will appear in the general services list. The Props column will show a reference to PeriodicTestService, the activate action, and the scenario itself.
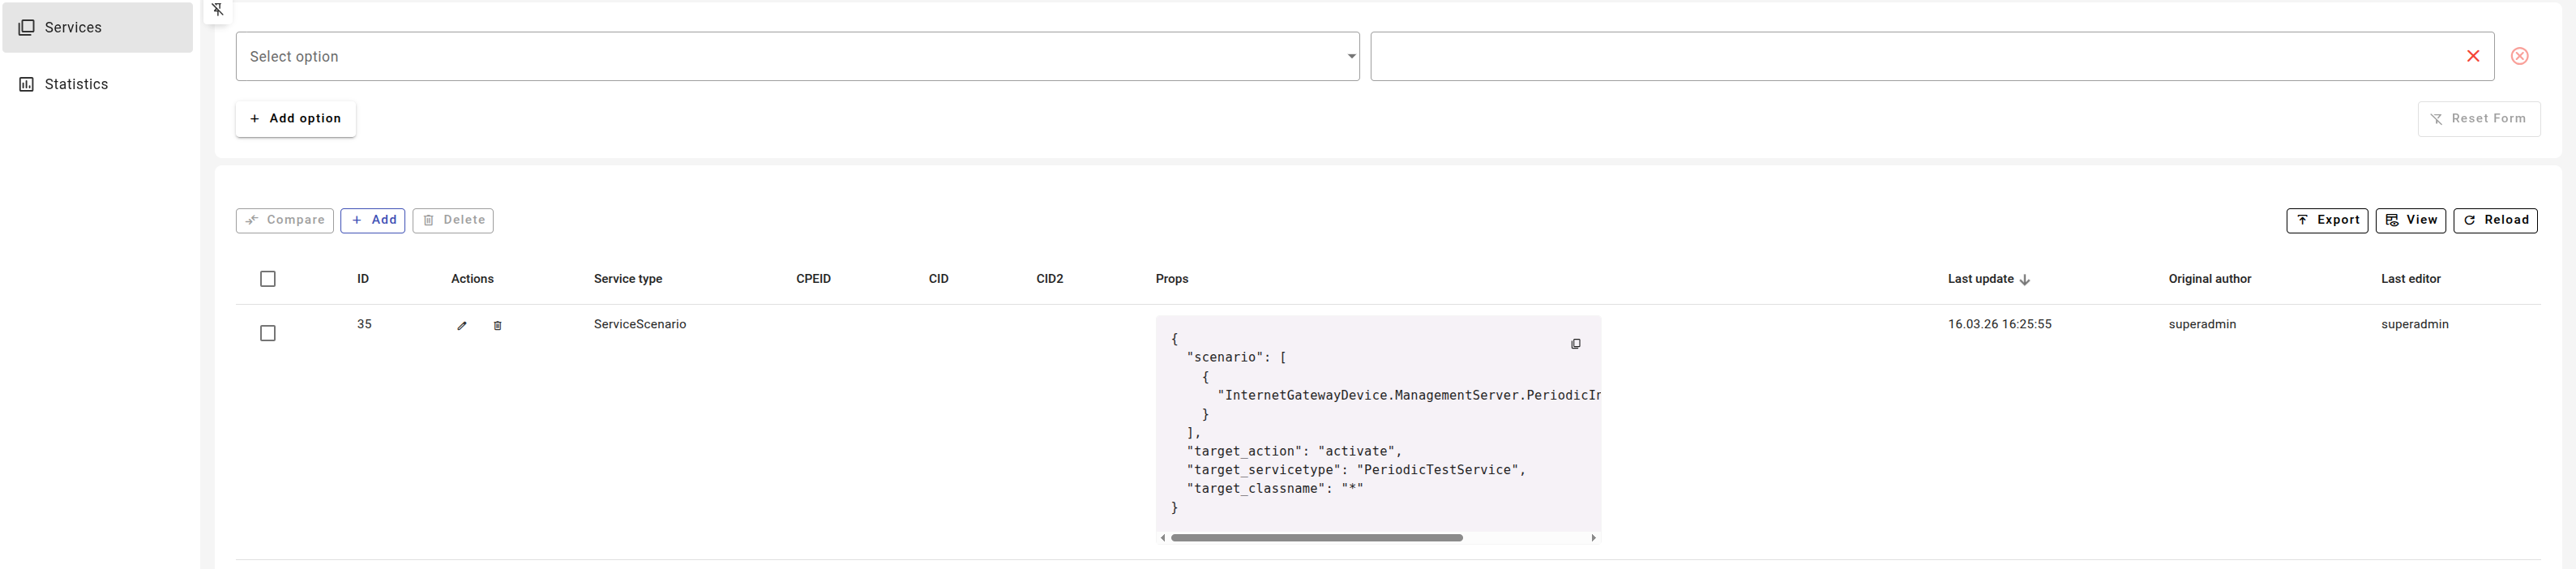
3. Creating a Campaign
- Go to the campaign management section.
- Click Add to create a campaign.
- Fill in the fields and click Add:
| Field | Value | Description |
|---|---|---|
| Campaign name | testServicePii | Campaign name |
| Enable | (checked) | Activate the campaign |
| CPE criteria | No conditions (or configure as needed) | |
| Script name | services_synchronization | Script name to execute, services_synchronization must be specified |
| Script parameters | Script parameters |
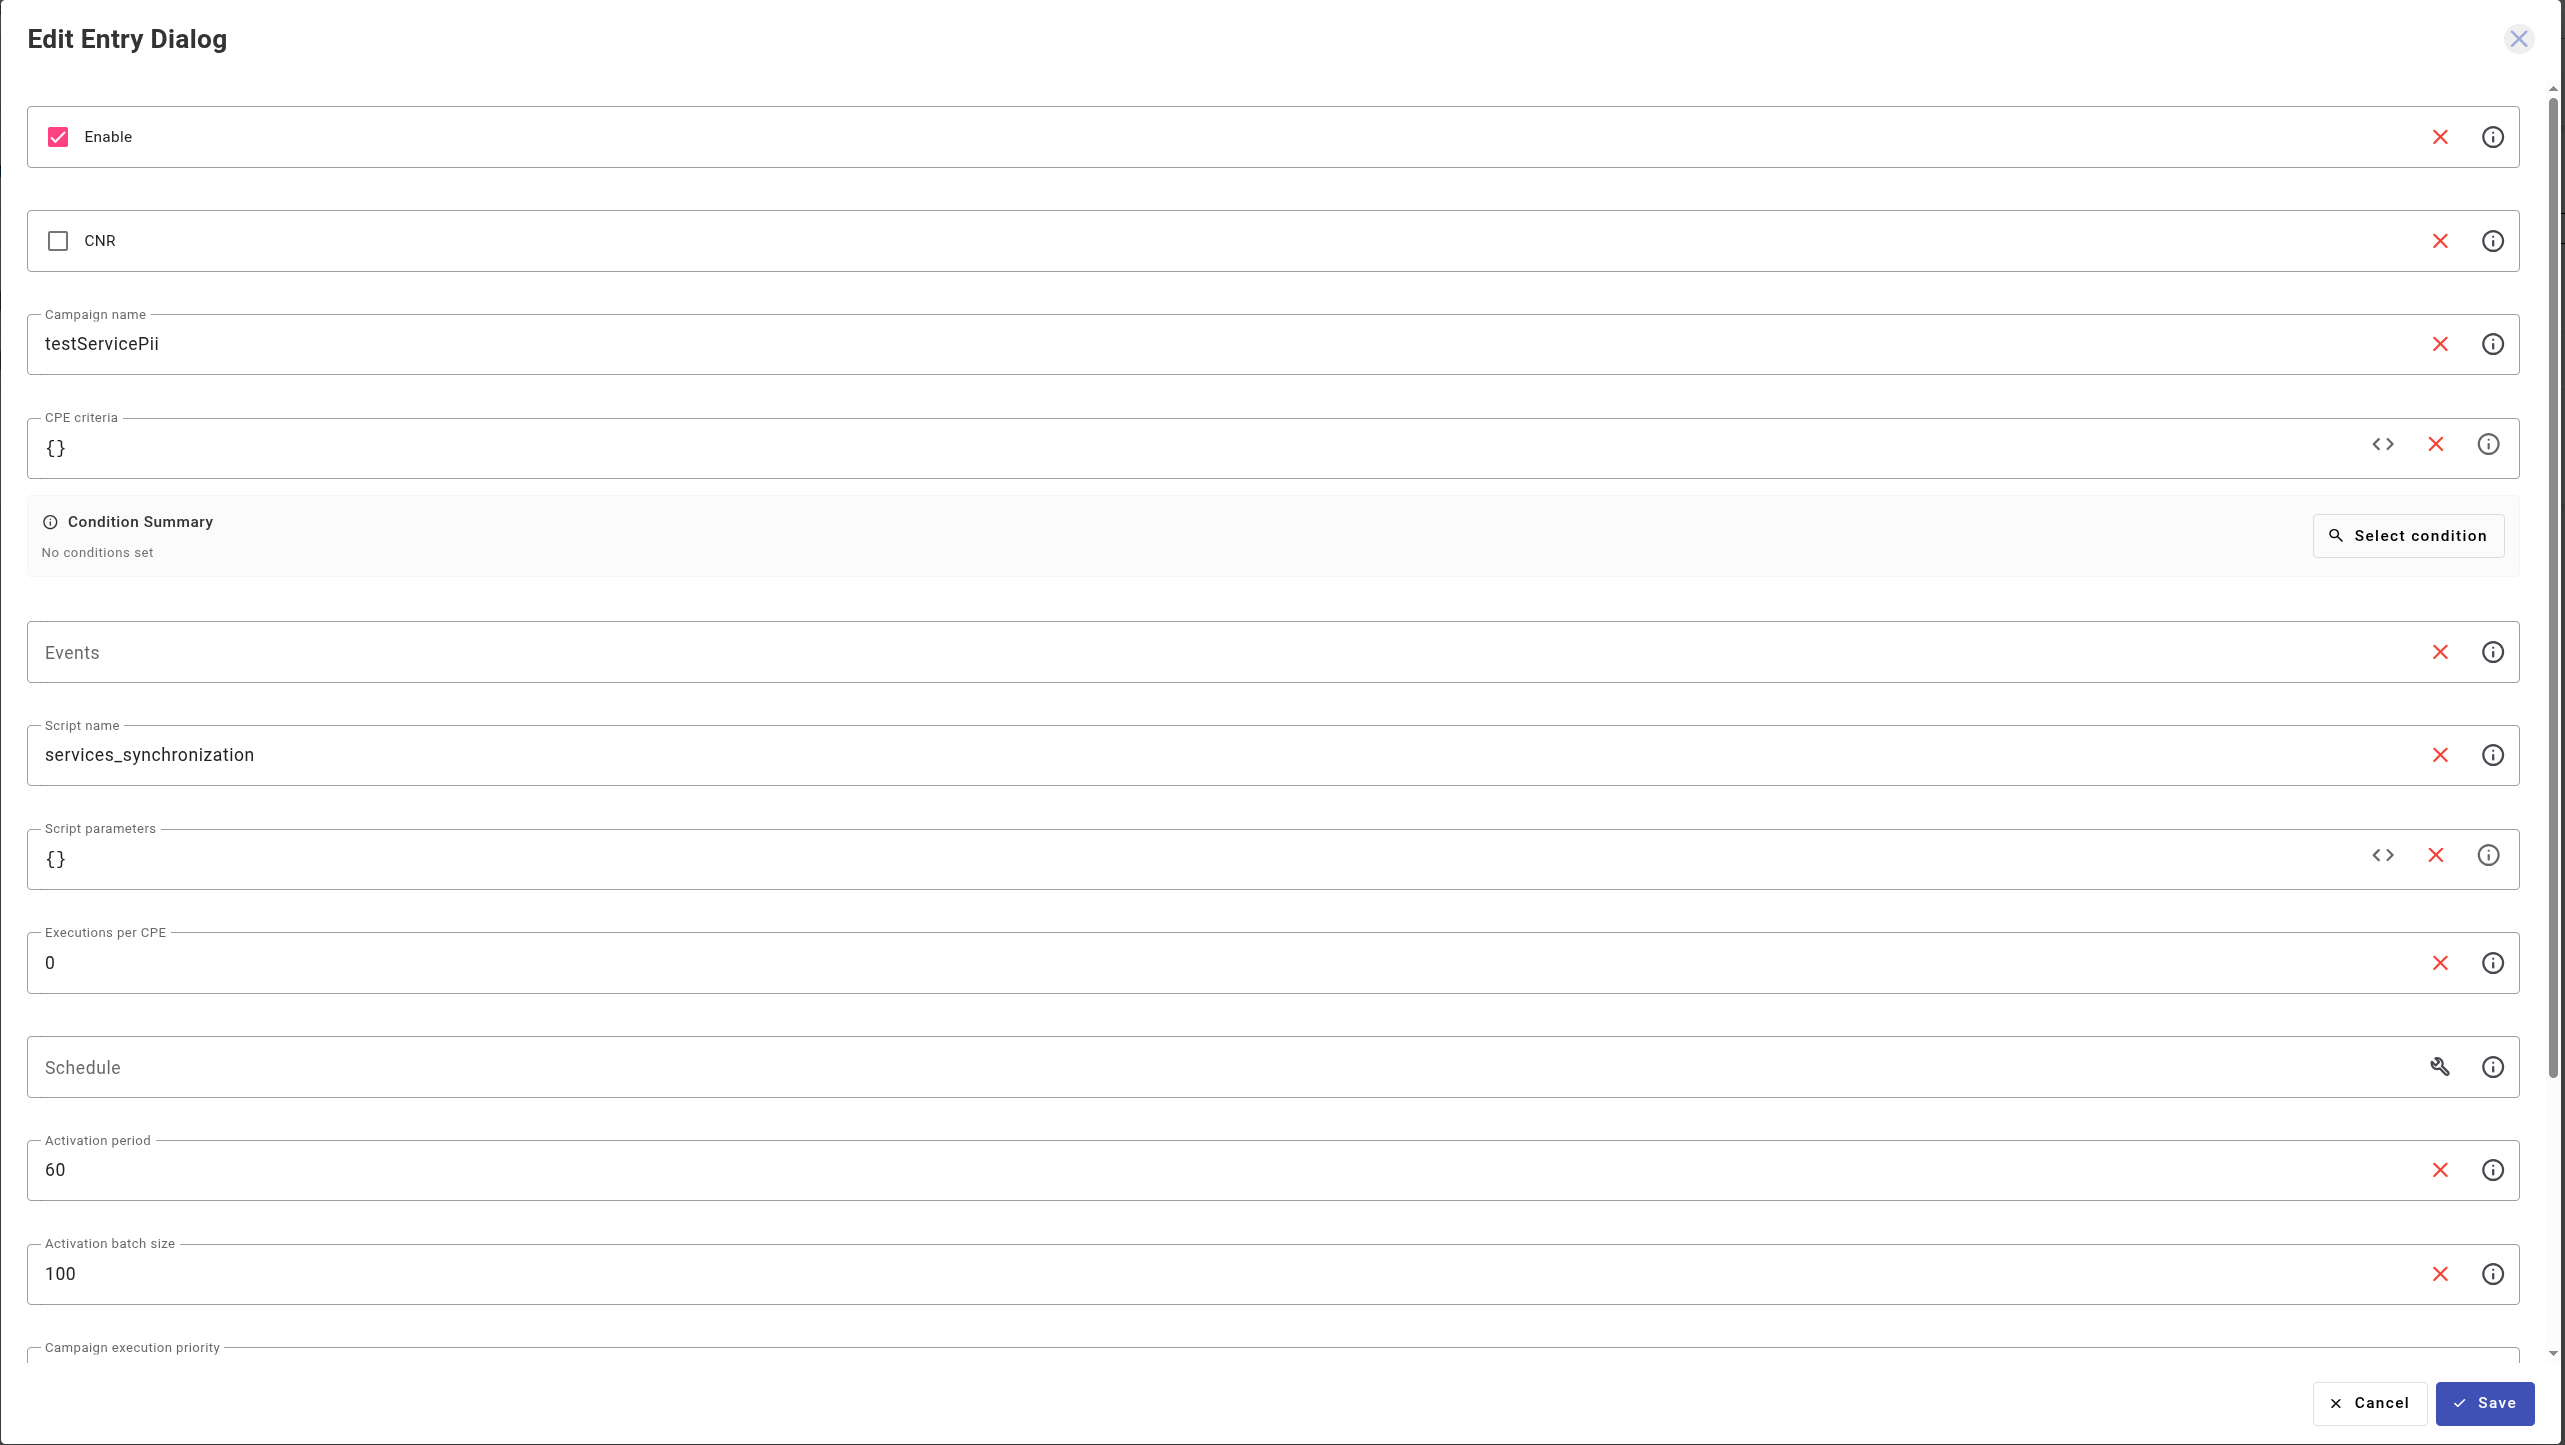
Important note about the
services_synchronizationscript:The
services_synchronizationscript activates all services of all types that are bound to the CPE by default. If you need to limit synchronization to a specific service type only (e.g., onlyPeriodicTestService), this must be explicitly specified in the script parameters:Script parameters:
{"servicetypes": ["PeriodicTestService"]}
The campaign will be launched and will synchronize (create or update) services for all matching CPEs. Either all services or only those specified in servicetypes will be affected.
4. API Endpoint Appearance
After successfully creating the service definition (PeriodicTestService), the system automatically adds the corresponding REST endpoints.
Available API Methods:
For managing the PeriodicTestService:
| Method | Endpoint | Description |
|---|---|---|
| POST | /servicestorage/api/v1/NBI/PeriodicTestService/activate | Service activation |
| GET | /servicestorage/api/v1/NBI/PeriodicTestService/getResult/{taskid} | Get result by task ID |
5. Service Activation
After creating the service definition, scenario, and campaign, the service can be activated in one of two ways: via REST API or through the user interface (UI).
Activating the Service via API
As shown in section 4, the automatically created endpoint is used to activate the service:
Request:
'POST' \
  'http://localhost/servicestorage/api/v1/NBI/PeriodicTestService/activate' \
  -H 'accept: application/json' \
  -H 'Content-Type: application/json' \
  -d '{
  "ServiceIdentifiers": {
    "cpeid": "DMS_DEVICE"
  },
  "ServiceParameters": {
    "pii": 3600
  }
}'
Response:
{
  "message": "Service activation was triggered",
  "code": 200,
  "data": {
    "taskid": 2
  }
Activating the Service via UI
Example: Bind the created scenario to a specific device (CPE) and set a specific value for the pii variable.
-
In the Services Portal section, click the Add button to create a new service.
-
Select the Service definition PeriodicTestService and click Next.

-
Fill in the form:
| Field | Value | Description |
|---|---|---|
| CPEID | DMS_DEVICE | Target device ID |
| Properties | pii: 3600 | Value for the variable (overrides the default value) |
 4. Click Confirm to save.
The services table will show an entry with:
- ServiceType:
PeriodicTestService - CPEID:
DNS_DEVICE - ID: Unique identifier (e.g., 72)
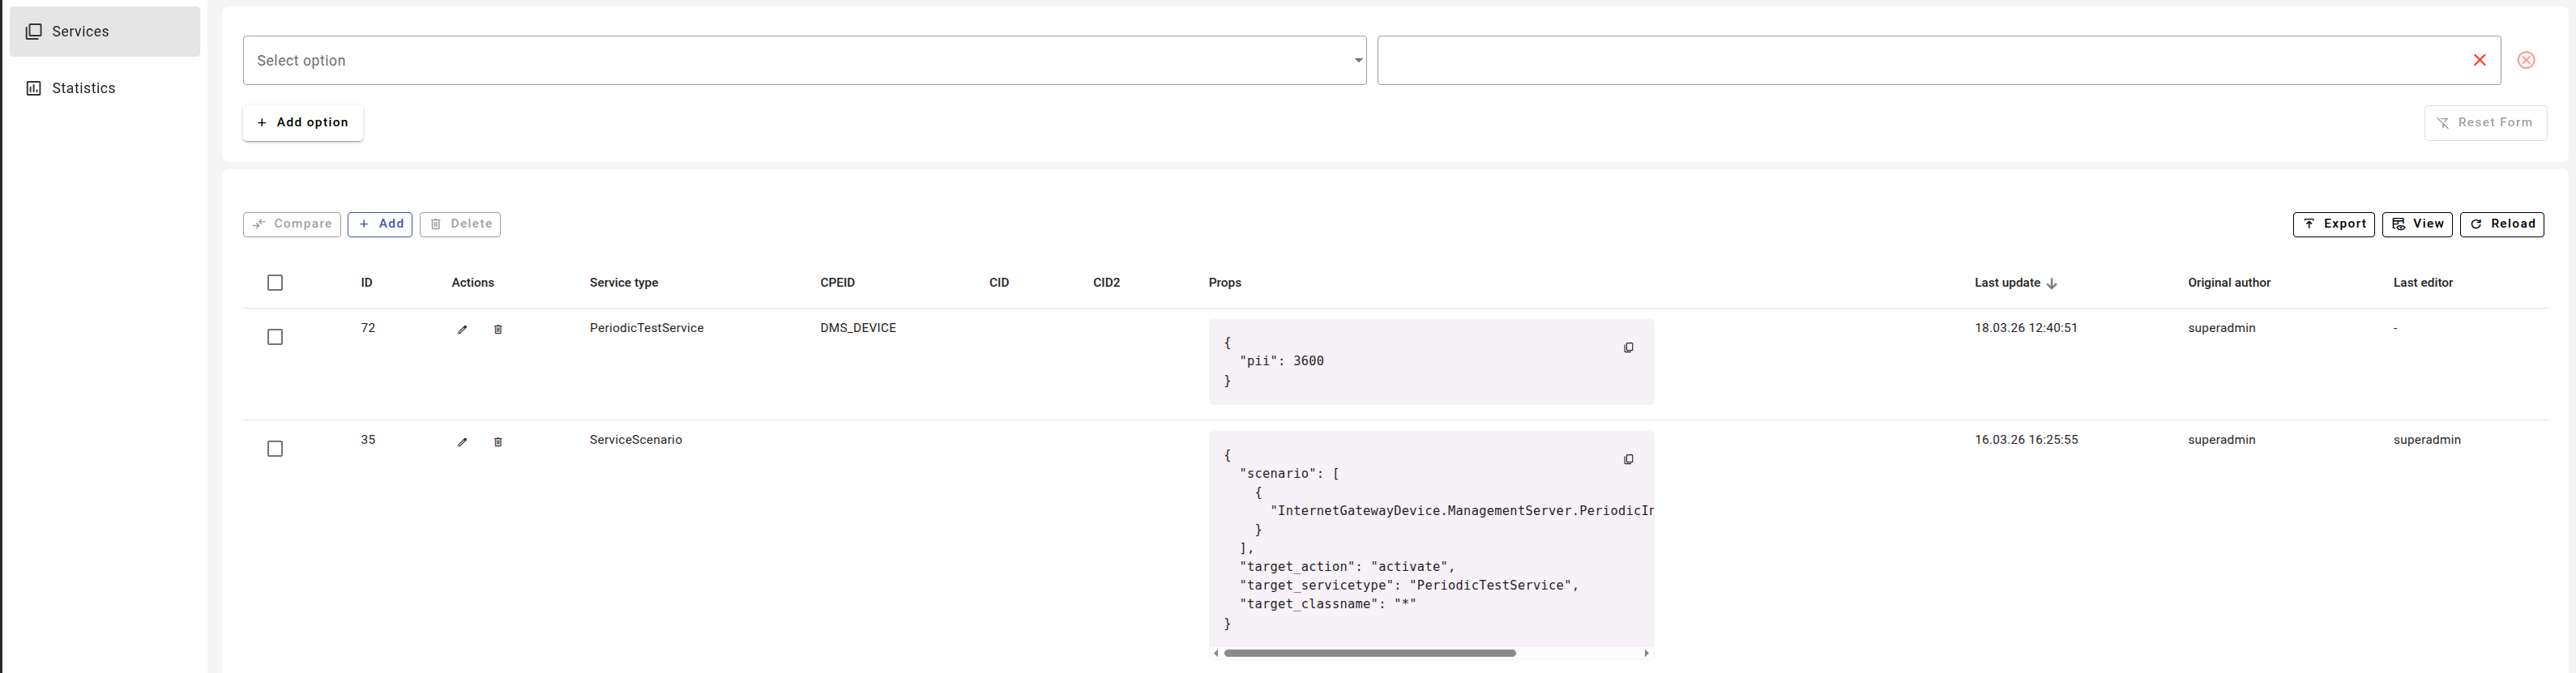
- Props: Data with the set "pii": 3600